Move Your Sims 4 Installation to Another Hard Drive
Do you have the Sims 4 game and DLC packs on your main hard drive taking up a bit too much hard drive space? What about mods and cc? If you’re like me, that Mods folder is taking up quite a big chunk of your hard drive space too. What if you could move the Sims 4 game and Documents directories somewhere else? Like a faster extra hard drive? You could also do this with an external drive, but I wouldn’t really recommend that unless you’re sure of what you’re doing.
Here’s some background: I’ve had the Sims 4 game installation with most packs installed on my main SSD internal hard drive (I use a desktop PC). By default, my Documents folder along with all the Sims 4 mods and other information was also on my main hard drive. There’s a new type of internal hard drive called a NVMe drive that can be even faster than SSDs. If you have a newer motherboard, it probably has a connector for this new type of drive. Mine does and I managed to find a 1TB NVMe drive on sale for around $50. I installed it with the intention of putting anything that took a long time to load on it, including the Sims. The following tutorial shows how I did it.
Part 1: Moving the Game Installation
You may be thinking that you’re going to have to download everything all over again to move it to a different location and have it actually work from that new location. Not so! Here’s how I did it:
Step 1: Go to your Sims 4 main installation directory which is usually C:\Program Files (x86)\EA Games\The Sims 4. (My installation was so old that mine was found at C:\Program Files (x86)\Origin\The Sims 4.) Now in a new window, open up the drive you want to move your installation to. For me, it’s D:\EA Games\The Sims 4. You’re going to need to copy EVERYTHING from the original The Sims 4 folder to the new one. If you have a lot of packs, this may take a while depending on the speed of the original hard drive and your computer’s processor.
Step 2: Once you are sure that you have all the files from the old installation moved to the new drive, open up the EA App and UNINSTALL The Sims 4. This will delete all of the files from the original directory and remove registry keys, shortcuts, etc.
Step 3: Now, while still in EA App, click to Download/Install the Sims 4. This part is important, when it asks where to install the game, make sure you enter the directory where you copied all of your game files earlier. Now click next to install.
Step 4: If you did Step 3 correctly, this will go super fast as all it will do is check the file integrity of the files you copied rather than downloading everything all over again and it will create new registry entries and shortcuts. For me it was under 60 seconds. If it’s much longer than that for you, you messed up somewhere.
Step 5: That’s it! Your Sims 4 installation should now be on the new drive and working. You might want to start it up just to check and be sure plus you’ll want to go into the Game Settings and check to use Mods and Custom Content.
Part 2: Moving the Documents Folder
This is actually far easier than the previous part. Note that I am using Windows 11. Windows 10 should be similar but other earlier versions may be different.
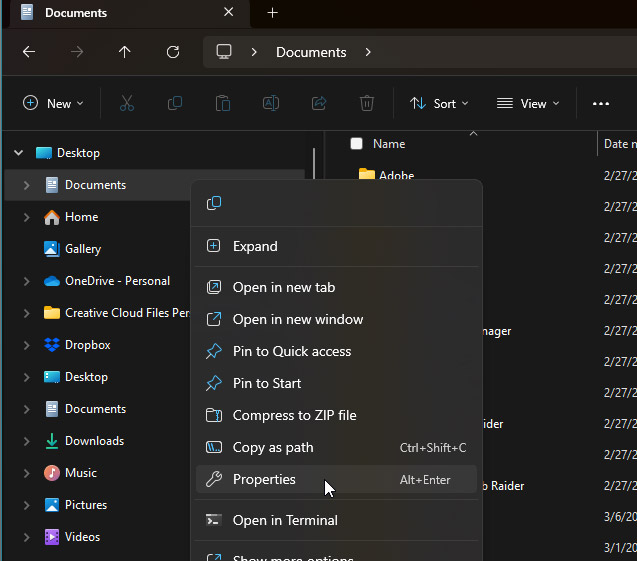
Step 1: See your Documents folder on the left side of the window? Right-click on it then select Properties from the right-click popup menu.
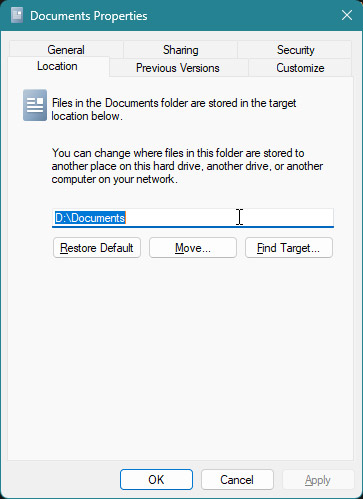
Step 2: In Properties, click on the Location tab. There you can see exactly where your Documents folder is. By default, it’s on the C drive in the directory C:\Users\*yourusername*\Documents. I moved mine to the new drive which has the letter D. So, click the Move… button and choose a new folder on your new drive. For me, I chose D:\Documents. When it asks if you want to copy everything to the new location, click YES.
Step 3: Wait. This may take a while depending on how large your Documents folder is and the speed of both the drive you’re copying from and copying to. It took about 35 minutes for me.
Step 4: Now you’re almost done. Once your certain that everything you need has been copied to the new Documents location on the new drive, go back to the old directory of C:\Users\*yourusername*\Documents and delete the old Documents folder as you no longer need it.
Step 5: Start up the Sims 4 and make sure it is loading all of your custom content and mods and tray files, etc. If it is, then you’re done. If it isn’t, make sure you enabled mods and custom content in the Game Options menu. You’ll need to restart the game after checking the boxes if you haven’t enabled them yet. Otherwise, move on to step 6.
Step 6: If something went wrong when copying your files from the old Documents location to the new one, right-click on the Documents icon like you did before and select Properties. Now go to the Location tab and click on the Restore Default button. That should restore everything back to the way it was.
Conclusion
This worked for me without a hitch, thankfully. To load my Sims 4 game went from about 15 minutes to about 4 or 5 minutes, which is fantastic for a modder needing to test mods. If you try this and have any troubles, feel free to contact me on Discord. NOTE: I’m not responsible for anything that goes wrong with your computer during your attempt to follow this tutorial. Do it at your own risk!


Laura
July 7, 2025 @ 2:41 am
Hi, can I ask, is it necessary to do part 2 of this process? What does it mean for the game? I have completed part 1 and everything works fine so I am just wondering what part 2 does or if it is necessary? Thank you for your help!
Lizzie P.
July 7, 2025 @ 3:46 am
The Documents folder is where all of the extra data for your Sims installation is kept. This includes Tray and Mods folders. If you don’t use mods or custom content, you can skip it. If you do use mods and custom content, then this will significantly improve your game’s loading speed if you move your Documents folder to a faster hard drive.
Laura
July 8, 2025 @ 5:14 am
Thank you so much for replying. That makes sense. I kept getting an access denied pop up when trying to complete part 2, I think it is due to One Drive syncing the documents folder and not allowing the location to be moved. I think it’s working okay for now. Appreciate your help ☺️
Luci
November 21, 2025 @ 5:08 pm
I don’t have anything in my program files (either of them) im not sure if thats wrong or what but EA isn’t in either. However I do have a Electronic arts in my C drive but when I open it all it shows is EA desktop and I also only have my documents older. Whenever I follow this I just use my documents folder but i get these weird folders called like SP12 or something and theres multiple like EP or GP and it fills up that folder where my mods and stuff are. Am I doing something wrong or am I missing a crucial part in all this by not having anything EA in my program files?
Lizzie P.
November 23, 2025 @ 10:05 pm
Hmm… It kind of sounds like your game installed to the Documents instead of the Program Files folder. I’m unsure. The folders like “SP, EP,or GP” are part of the Sims 4 program. How old is your game installation? It used to be in the Program Files/Origin folder before it became Program Files/EA. I’m still not 100% well yet, but I will try to help you if I can. Could you send me a message through my Contact form, and I’ll try to help you through email?